Tattooing Your Traveler’s Notebook: Acrylic Paint
- Patrick Ng

- Aug 24, 2025
- 2 min read
Sometimes the most personal Traveler’s Notebook doesn’t come from a store—it starts with your own brush, a splash of paint, and a little nerve. You’re not just tattooing the cover; you’re giving it bold face paint that tells your story every time you pick it up.

Planning
Slow down. Look closely at your cover.
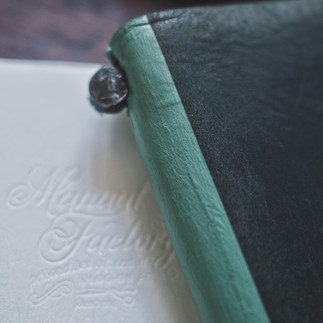
What colors jump at you? Let the original leather peek through with your favorite accent, or go all in—one strong color, a hand-cut stripe, your signature pattern.
You don’t need to paint the whole thing. Sometimes a hint is louder than a billboard. Spines, corners, edges—choose what changes. Mask off the rest.


Painting
I used Angelus gear—the same folks sneakerheads trust for leather kicks. The workflow is easy:
Leather Preparer & Deglazer: This clear liquid strips off the factory finish so paint can anchor in. Wipe it over evenly.
Masking: Painting just a section? Mask the rest. Messy bleed-through ruins your lines.
Acrylic Leather Paint: Use thin coats, not thick globs. Brush or sponge—it’s up to you. Let each layer dry before adding more. I found three coats nailed it.
Acrylic Finisher: When the paint’s dry, brush on the finisher two or three times. It keeps the surface flexible and crack-free. Let everything cure in fresh air for 24 hours—don’t rush this step.
Extra Ritual
Give it a finishing touch: sew a button on the bookmark that matches your paint. It’s a small move with big character.
This isn’t just a weekend project—it’s you, making something unique. Your Traveler’s Notebook becomes a custom, one-off edition you can’t find on any shelf. That’s the real reward—carrying around a piece of your creation.
Share your finished work on Instagram and tag me. I can’t wait to see how you make it your own.


Comments