How to Torch Your Own Kaweco Liliput Fireblue Edition
- Patrick Ng
- Jun 7
- 3 min read
Many of you have asked how I torched my stainless steel Kaweco Liliput into a vibrant Fireblue, and I'm here to tell you: it is surprisingly easy.

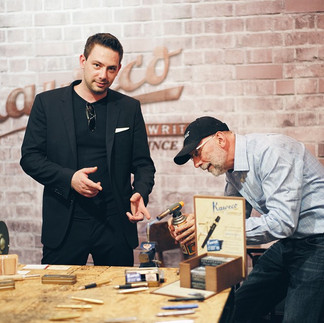
If I hadn't seen Kaweco owner and CEO Michael Gutberlet do it in person back in 2019, I probably wouldn't have had the guts to hold a flame to my own pen. Michael and his son Sebastian were in Hong Kong for a trade show, and when I visited their booth, Michael was giving a live demo, creating every single Fireblue finish by hand.


It was mesmerising to watch the metal transform. Keep in mind that different butane gases produce slightly different results, so your final patina will be completely unique to you. Here is exactly how you can recreate the magic at your own workbench.
1. Preparation is Everything
The final look of your Fireblue depends heavily on how you treat the surface before applying any heat.
For a smooth, even finish: Wipe the stainless steel surface down completely with an alcohol wipe and avoid touching the barrel with your bare hands before torching.
For a rugged, textured look: Sprinkle a little something onto the surface. I personally applied small touches of oil to different parts of the pen. This causes the temperature to build up at varying speeds, creating a mottled, beautifully imperfect pattern.
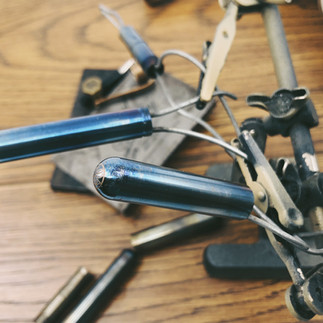
2. Disassembly and Rigging
You cannot torch the pen while it is fully assembled.
Remove the nib and feed from the front section.
Separate the pen into its three main metal components: the grip, the barrel, and the cap.
Find some metal wire long and strong enough to support the weight of the pen parts.
Thread the wire through the three pieces, ensuring you can freely rotate them for an even torching angle.
Secure the wire onto your workbench using a vice.
Clear your workspace of any clutter or flammables that could catch fire. Ensure you have plenty of room to manoeuvre around your setup.


3. The Torching Process
Start torching the parts one by one. The key here is continuous motion. Do not focus the flame on a single spot; instead, apply the heat evenly across the surface, sweeping the torch back and forth just like spray painting.
When you heat stainless steel, you are growing a microscopic layer of chromium and iron oxide on the surface. As this layer thickens, it refracts light differently, causing the colour to shift dramatically.
The Heat Colour Progression
Color Stage | Approximate Temp | What is Happening |
Pale Straw / Yellow | 220°C - 290°C | The first sign of change; a light, warm metallic tint. |
Brown / Purple | 250°C - 370°C | The gold deepens into a rich bronze, quickly snapping into violet. |
Bright Deep Blue | 280°C - 430°C | The sweet spot! The oxide layer cancels out yellow/red light waves. |
Pale Grey / Black | Overheating | The blue fades to a dull grey or flakes into charcoal black. |

4. Nailing the Colour Change
The transition from silver to blue happens in a flash. Control is the most nerve-wracking and satisfying part of the process.
Pull the flame early: Stainless steel holds onto heat. The moment you see the colour shifting from purple to the very first hint of blue, remove the torch. The residual heat in the metal will carry the reaction forward into that deep blue. If you wait until it looks perfectly blue to remove the flame, the residual heat will push it into the dull grey zone.
Don't panic if you overshoot: If you accidentally heat the metal too much and it turns flat grey, it isn't ruined. Because this is just a surface oxide layer, you can simply sand it back down to bare silver stainless steel and restart the process! Sanding it off can even give you a more interesting pattern on your second try.
5. The Critical Cooldown
Once you achieve the colour you want, let the pen cool down naturally.
Avoid sudden cooling or quenching. Make sure all three pieces are left to cool at their own pace in the exact same setting. This is crucial because sudden temperature drops can warp and distort the delicate threading. Letting it cool naturally ensures you can screw the grip, barrel, and cap back together perfectly smoothly.

The Final Result
Once everything is completely cool, reassemble your Liliput. I personally think pairing a Fireblue finish with a brass or bronze pen clip looks incredibly handsome. The warm, metallic gold tones contrast perfectly with the deep blues and purples of the torched steel.


It is a super fun, rewarding DIY project. Safe torching! Let me know how it goes by commenting and sharing your results. (By the way, after 7 years of usage, the colour is now greyish, so I may have to torch it once again)